
A Guide to QR Code to Payment for Crypto Checkouts
A QR code to payment system is beautifully simple. It lets customers pay you just by scanning a code with their phone. This isn't some niche tech anymore; it's become a global standard because it’s fast, cheap, and just about everyone has a smartphone. It’s completely changed the game for how businesses, big and small, take in money.
Why QR Code Payments Are Dominating Global Commerce

Before we jump into the technical side of things, it’s worth taking a moment to appreciate the "why" behind this massive shift. The explosion of QR code payments is more than a trend—it's a real evolution in how we handle transactions, driven by real-world market needs and new consumer habits.
The magic is in its simplicity. It removes all the usual friction at checkout, whether you’re selling online or face-to-face. For merchants, the advantages are impossible to ignore. Traditional card payments mean pricey POS hardware and a laundry list of fees. A QR code to payment system, on the other hand, can be as straightforward as showing a picture on a screen or a printout, which is a huge deal for small businesses.
The Numbers Behind the Surge
The stats really tell the story. Think about it: pulling out your phone to scan a simple black-and-white square is quickly replacing the old routine of digging for cash or cards. QR code use was already on the rise back in 2021, but it’s projected to see a massive 323% surge by 2025.
This growth is supercharged by smartphone ownership hitting over 6.8 billion devices globally and apps that make scanning second nature. In fact, by 2025, an estimated 2.2 billion people—that’s almost one-third of all smartphone users—will likely use QR codes for payments. That pushes the total transaction volume to a staggering $3 trillion in that year alone.
This isn't just about making things easier; it's about making them accessible. In many developing economies, QR codes have leapfrogged traditional banking systems, giving millions their first real entry into digital commerce.
Why It Matters for Your Business
Looking at the global picture, it’s clear that traditional payment processing has its limits. If you’re running a business, especially in e-commerce, you’ve probably run into the challenges with traditional payment gateways, from sky-high fees to frustrating restrictions on what you can sell.
This is where a QR code to payment solution, especially one built for crypto, becomes a powerful tool. It gives you:
- Lower Transaction Costs: Cutting out the traditional middlemen usually means you keep more of your money.
- Enhanced Security: Transactions are encrypted, and customers never have to hand over sensitive card details, which dramatically reduces the risk of data breaches.
- Global Reach: You can accept payments from anyone, anywhere in the world, without the usual headaches of cross-border fees and complexities.
This isn’t just about adding one more payment button to your checkout. It's about aligning your business with a global standard that’s built for speed, security, and accessibility. That's the mindset we'll carry into the technical guide that follows.
Getting Your Environment Ready for Crypto QR Codes
Alright, let's roll up our sleeves and get things set up. This is where we move from just talking about crypto payments to actually building the foundation to accept them with BlockBee. The whole point here is to get your account ready to generate that first QR code to payment link.
Your first port of call is the BlockBee dashboard. This is your command center for everything crypto-payment-related. We designed it to be pretty straightforward, even if this is your first time dipping your toes into this world. Once you’re in, just take a minute to get familiar with the layout. You’ll find everything from transaction logs to wallet management, but what we're after right now are your API credentials.
Here’s a look at the main dashboard you’ll be working from:
This gives you a great at-a-glance view of your payment activity and gets you to all the tools you need.
Generating Your API Key
For your application to talk to BlockBee's system, it needs an API key. Think of it as a secret handshake—it’s a unique token that proves your requests are legitimate and ensures only you can create payment requests for your account.
Finding it is easy. Just head over to the API settings in your dashboard. You'll see an option to generate a new key. A quick but important word of advice: treat this key like you would any password. Keep it safe in an environment variable or a proper secrets manager. Whatever you do, never expose it in your frontend code.
A Quick Note on How We Work: BlockBee is a non-custodial service. This is a big deal. It means we never hold your funds. Payments go straight from your customer's wallet to the wallet addresses you provide. Your API key is just the tool that creates the payment addresses and handles notifications; it doesn't give us any access to your crypto.
Adding Your Wallet Addresses
Before you can get paid, you have to tell BlockBee where the money should go. This is a critical piece of the puzzle for setting up your QR code to payment flow. Back in the dashboard, you’ll find a section dedicated to managing your wallet addresses.
You'll need to add a receiving address for every cryptocurrency you want to accept. It's a simple mapping process.
- Bitcoin (BTC): Pop in your main BTC wallet address.
- Ethereum (ETH): Do the same for your ETH address.
- Litecoin (LTC): And again for your LTC address.
This setup links your own wallets directly to the BlockBee system. So, when a customer pays you in BTC, the funds are automatically routed straight to the BTC address you listed here. It’s that direct.
The demand for this kind of seamless payment tech is exploding. The QR code payment market is expected to rocket from $12.54 billion in 2024 to a staggering $61.73 billion by 2033. This growth is fueled by massive smartphone use, especially in areas like Asia-Pacific, which already grabbed a 29.04% revenue share in 2024. You can see more data on this trend over at Grandview Research.
Once your API key is generated and your wallet addresses are plugged in, your environment is ready to go. The next step is to start making actual API calls to generate the payment data. If you want to get a bit more technical and understand the nuts and bolts of our API, our detailed guide on the crypto payment gateway API is the perfect resource to keep handy as we move on.
Alright, let's get our hands dirty and create your first crypto payment QR code. Now that you've got the basic setup handled, this is where the magic happens—turning a bit of code into a seamless payment experience for your customers.
The whole process hinges on a single, clean API call to BlockBee. Your application will simply ask BlockBee for a fresh payment address for a specific cryptocurrency. This isn't just any old address; it’s a unique one generated specifically for that transaction, which is key for tracking payments accurately. No more guesswork.
Making the API Call
Let's see what this looks like in the real world. Using a simple tool like cURL, you can request a Bitcoin (BTC) address with a command like this:
Breaking that down, you’re telling BlockBee which coin you want (btc), authenticating with your API key, and providing a callback URL. That callback is absolutely essential—it’s the mechanism BlockBee uses to ping your server and say, "Hey, that payment just came through!"
Static vs. Dynamic QR Codes: A Critical Choice
Before you go any further, you need to decide between using a static or a dynamic QR code. They might look the same to the naked eye, but functionally, they are worlds apart. Picking the wrong one can lead to some serious operational headaches down the line.
A static QR code is the simplest form. It's just a fixed crypto address encoded into an image. Think of it like a digital tip jar on a coffee shop counter. The address never changes. It’s great for donations or simple, fixed-price payments where you don’t need to connect a specific payment to a specific customer.
On the other hand, a dynamic QR code is generated on the fly for every single transaction. This is the gold standard for any e-commerce or invoicing setup. When a customer’s cart totals 0.0015 BTC, your system pings BlockBee to create a brand-new, single-use address for exactly that amount. This direct link between the payment and the order makes your accounting a breeze.
For any real e-commerce operation, dynamic QR codes are the only way to go. They’re the foundation of a reliable qr code to payment system and save you from the nightmare of manually matching up payments sent to a single static address.
To make the choice even clearer, here’s a quick comparison.
Static vs Dynamic QR Codes for Payments
Choosing the right QR code type is fundamental to your payment flow. This table breaks down the key differences to help you decide which one fits your needs.
| Feature | Static QR Code | Dynamic QR Code |
|---|---|---|
| Use Case | Perfect for donations, personal tips, or fixed-price items where tracking isn't critical. | The standard for e-commerce checkouts, custom invoices, and any unique order. |
| Data | Always points to the same, unchanging crypto address. | Generated fresh for each transaction with a unique address and often a pre-filled amount. |
| Tracking | Very difficult to link a specific payment to a specific user or order without manual work. | Effortlessly matches every payment to its corresponding order, making reconciliation automatic. |
| Security | Lower privacy, as all transactions are publicly visible on a single address. | Much higher privacy since each address is typically used only once. |
In short, if you're running a business, dynamic QR codes provide the reliability and tracking you need.
Turning the Address into a Scannable QR Code
Once you make the API call, BlockBee fires back a JSON response. The golden ticket in that response is the address_in field—that’s the crypto address you need to show your customer.
Let's put it all together with a quick Python example. Here’s how you’d request the address and then use a library to generate the actual QR code image.
import requests import qrcode
API_KEY = "YOUR_API_KEY" CALLBACK_URL = "https://your-store.com/callback_url"
Ask BlockBee for a new payment address
params = { 'coin': 'btc', 'api_key': API_KEY, 'callback': CALLBACK_URL } response = requests.get('https://api.blockbee.io/checkout/request/', params=params) data = response.json()
Check if the request was successful
if data.get('status') == 'success': payment_address = data['address_in'] print(f"Generated Payment Address: {payment_address}")
# Now, let's create the QR code image from that address
qr_img = qrcode.make(payment_address)
qr_img.save("payment_qr.png")
print("QR code saved as payment_qr.png!")
And just like that, you've gone from a simple API request to a scannable payment_qr.png file. This is the image you'll embed right into your checkout page, completing the qr code to payment journey for your customer.
Integrating QR Codes Into Your Checkout Flow
So you’ve got a QR code. That's a great start, but the real magic happens when you weave it seamlessly into your customer's checkout journey. This is where sharp UI/UX design meets solid backend logic to create a smooth, intuitive payment experience. How and where you present that QR code can be the deciding factor between a successful sale and a lost customer.
The most common and effective place for it is right on the checkout page. When a customer chooses to "Pay with Crypto," your interface should immediately load the QR code along with simple, clear instructions. This keeps everything in one place, minimizing clicks and keeping the user in a familiar environment, which is huge for building trust.
Another popular approach is to use a popup modal. This can be a smart move if you offer a ton of payment options and want to keep the main checkout page from looking cluttered. A modal zeroes in the customer's focus on the payment itself, showing the QR code, the exact amount, and maybe even a countdown timer for the payment window. It creates a dedicated, clean space just for completing the transaction.
Designing the Payment Interface
A well-designed payment interface does more than just show a QR code—it actively guides the user. Your goal should be to answer their questions before they even think to ask them.
That means you need to display not just the code, but also the precise amount of cryptocurrency due and which specific coin they're paying with. For instance, your interface should clearly state something like: "Scan to pay 0.0015 BTC." This simple step prevents users from sending the wrong amount, which is a one-way ticket to frustrating support chats and a soured experience. It's also a great idea to include a "Copy Address" button, a must-have for desktop users paying from an exchange or a browser wallet.
This flowchart breaks down the straightforward backend process that powers what your customer sees on their screen.
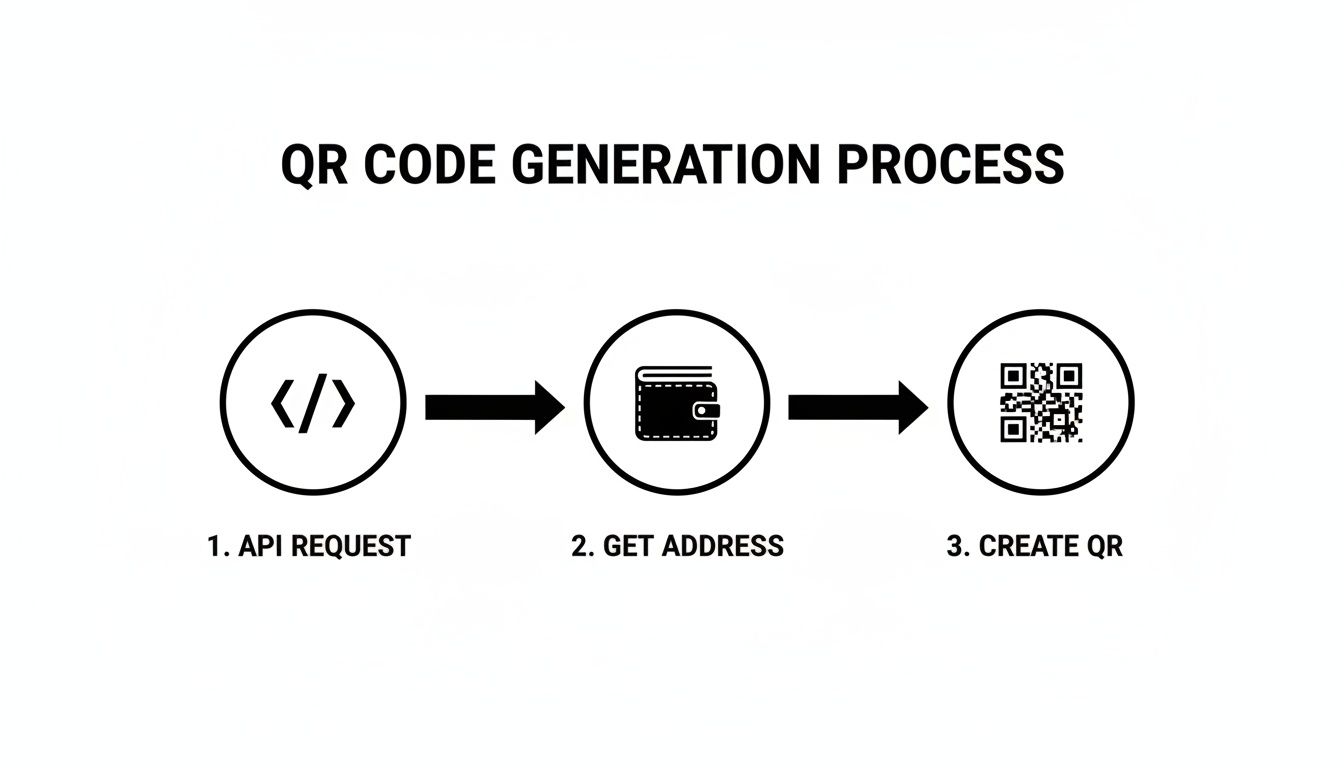
As you can see, a single API request is all it takes to get a unique payment address, which is then instantly converted into the scannable QR code your customer uses.
Automating Payment Confirmations with Webhooks
The last piece of the puzzle is confirming the payment automatically. Nobody has time to manually check wallets for incoming transactions—it’s not scalable and creates frustrating delays. This is exactly what BlockBee’s webhooks are for. A webhook is simply an automated message that BlockBee sends to your server the moment a payment is detected.
Setting this up is non-negotiable for a professional crypto payment system. Inside your BlockBee dashboard, you just need to provide a URL endpoint on your server. When a payment lands in the address tied to an order, BlockBee fires off a POST request to that URL, packed with all the transaction details.
A slick, QR-code-based payment flow does more than just look good. It's a powerful tool to help reduce shopping cart abandonment by making checkout faster and simpler. A quick, automated confirmation is a massive part of that.
Your server-side code needs to be listening for these incoming webhooks. When a notification comes in, your script should perform a few quick checks:
- Verify the Notification: First, always confirm the request is genuinely from BlockBee to block any spoofing attempts.
- Match the Payment: Use the data in the webhook to find the corresponding order in your database.
- Check the Amount: Make sure the amount paid is exactly what was expected.
- Update Order Status: If it all checks out, flip the order status from "Pending" to "Paid" or "Processing."
This automated handshake ensures that as soon as your customer's payment is confirmed on the blockchain, your system knows about it and can get to work fulfilling the order, usually without any human needing to lift a finger. For anyone looking for a pre-built solution that already handles all this logic, the BlockBee checkout page is a ready-to-go, hosted option.
Just imagine a simple PHP script that handles a webhook. It would parse the incoming JSON data, look up an order ID, and run a quick database query to update the order's status. It's this straightforward automation that elevates a basic crypto payment button into a seamless, commercial-grade checkout flow, making sure your customer's journey ends on a high note.
Essential Security and User Experience Practices
Getting a qr code to payment system up and running is one thing. Making it secure and user-friendly is what separates a professional implementation from a frustrating, risky one. You've got to get both sides right to build trust and keep customers happy.
Think of your API key as the keys to the kingdom. It should never, ever see the light of day on the client-side. Hardcoding it into your JavaScript is a disaster waiting to happen. The only place it belongs is on your server, tucked away safely in an environment variable or a proper secrets management service.
Safeguarding Your Webhook Endpoint
Your webhook endpoint is the direct line from BlockBee to your application, and if you leave it unsecured, you’re basically leaving the back door wide open. Without protection, anyone could send a fake payment notification to your server, tricking your system into shipping products for free.
That's why you have to validate every single notification that comes through. BlockBee makes this straightforward by signing each request. Your backend code needs to check this signature against your secret key before it does anything else. It's the only way to confirm the message is legit and hasn't been messed with.
Also, a pro tip: process your webhooks asynchronously. As soon as a notification hits your endpoint, acknowledge it immediately with a 200 OK response, then pass the actual logic—like updating your database—to a background queue or worker. This prevents timeouts and keeps your system from crumbling under a sudden rush of transactions.
Key Takeaway: Treat every incoming webhook as untrusted until proven otherwise. Signature verification isn't optional—it's an essential security layer for any legitimate payment system.
To really get a handle on how these notifications work under the hood, it's worth understanding what an Instant Payment Notification (IPN) is. This context is invaluable for building a truly robust integration.
Creating a Flawless User Experience
A bulletproof backend is only half the story. If the customer's experience is confusing, they'll just abandon their cart. Your qr code to payment flow has to be smooth and reassuring from start to finish.
It starts with clear instructions right beside the QR code. Never assume your users know the drill. A simple prompt like, "Scan with your crypto wallet to pay," along with the precise amount and currency, eliminates any guesswork.
Another critical piece is setting a payment timeout. A dynamic QR code shouldn't be valid indefinitely. Giving it a 15-30 minute lifespan creates a bit of urgency and helps you manage inventory for abandoned carts. Once the timer runs out, the order should be automatically canceled.
Here are a few more battle-tested tips to polish the user journey:
- Real-Time Status Updates: Don't leave your customer staring at a static screen, wondering if their payment went through. Use a bit of JavaScript to listen for the confirmation and update the UI in real-time. Seeing a message change from "Awaiting payment..." to "Payment received! Processing your order..." is incredibly reassuring.
- One-Click Copy Button: A lot of people pay from a wallet on their desktop. Adding a simple button that copies the crypto address to their clipboard is a small touch that makes a huge difference.
- Graceful Error Handling: What happens if someone tries to pay after the timeout? Don't just show them a generic error. Display a clear, helpful message like, "This payment request has expired. Please create a new order to try again." This guides them back on track instead of leaving them confused.
Got Questions About Crypto QR Code Payments?
Jumping into any new payment tech is bound to stir up some questions. From what I've seen, when developers and merchants start implementing crypto QR code to payment systems, they usually run into the same handful of "what if" scenarios. Getting these cleared up early saves a ton of headaches and helps you build a much smoother checkout process right from the get-go.
Let's be real, handling a perfect transaction is easy. The true test of a great system is how it deals with the curveballs.
What Happens If a Customer Pays the Wrong Amount?
This happens more often than you'd think. Someone gets distracted and sends a little too much, or not quite enough. Don't worry, BlockBee is built for this. The webhook notification that hits your server contains the full story: how much the customer paid and how much you were actually expecting.
This is where you can get clever with your backend logic.
- Underpayments: You can have your system automatically shoot the customer an email with a new payment link for the difference. This keeps the order moving and makes it simple for them to fix the mistake.
- Overpayments: For these, you could flag the order for a manual review or even automate a refund for the excess amount.
Handling these exceptions gracefully is huge for customer trust. An automated, helpful response is infinitely better than leaving them hanging.
How Fast Are the Payment Confirmations?
Confirmation speed is a big one, since every blockchain has its own rhythm. BlockBee gives you a head start with an instant "zero-confirmation" notification the second the transaction appears on the network.
For things like low-cost digital downloads, that initial ping is often all you need to release the product. The risk of a double-spend is pretty minimal. But if you're shipping an expensive piece of hardware, you'll want more certainty.
You're in complete control of the speed vs. security trade-off here. BlockBee’s webhooks keep pinging your system as more confirmations roll in on the blockchain. This lets you set your own rules, like waiting for three Bitcoin confirmations before you ship the order.
Can I Use the Same QR Code for Multiple Payments?
Technically, yes, you can have a static QR code pointing to the same address forever. But for e-commerce, that's almost always a bad idea. A static QR code is perfectly fine for something simple, like a donation button where you aren't tracking individual transactions.
For actual orders in a store, you need dynamic QR codes. BlockBee generates a brand new, single-use address for every single transaction, which is critical for a few key reasons:
- Privacy: It stops nosy competitors from easily viewing your entire sales history on a public ledger.
- Security: It keeps transactions separate, which minimizes certain risks.
- Accuracy: This is the most important one. It's the only way to reliably and automatically link every payment to the right order in your system.
Do I Need to Run My Own Crypto Node?
Absolutely not, and honestly, this is one of the biggest wins of using a service like this.
Running and maintaining full nodes for a bunch of different cryptocurrencies is a massive, expensive headache. It demands serious technical expertise and constant babysitting.
BlockBee handles all that messy infrastructure for you. Your team just works with a clean, straightforward API. This saves you an incredible amount of development time, server costs, and ongoing maintenance, so you can focus on building your actual product.
Ready to build a seamless crypto checkout experience without the hassle? With BlockBee, you get a developer-friendly API, robust plugins, and the infrastructure to accept over 70 cryptocurrencies today. Start building at https://blockbee.io.