Your Guide to WooCommerce Payment Gateway Setup
Choosing the right WooCommerce payment gateway is one of those foundational decisions that can make or break an online store. It's not just about getting paid; it’s about shaping your customer's final impression and directly impacting your revenue. Think of it as the engine of your checkout process.
Why Your Payment Gateway Choice Is Critical

Before we jump into the nuts and bolts of setting up BlockBee, let's take a moment to appreciate why this choice matters so much. At its core, a payment gateway is the secure link between your customer's bank and your business account. If that link is clunky, slow, or seems untrustworthy, you’re looking at abandoned carts and lost sales. Get it right, though, and you build the kind of confidence that brings customers back.
WooCommerce has been a giant in eCommerce ever since it launched back in 2011. In fact, by 2025, it was running over 6 million active online stores and holding down a global market share of roughly 38.76%. That massive adoption isn't an accident—it speaks volumes about its power and reliability.
Impact on Customer Experience and Trust
The checkout is where the magic happens—or where it all falls apart. This is the most sensitive step in the entire buying journey, and any friction here gets magnified. A great WooCommerce payment gateway blends right into your site, creating a seamless experience. It avoids those jarring redirects to weird-looking, third-party pages that make customers second-guess their purchase.
It's also about giving people choices. Your customers expect to pay their way, whether that’s with a standard credit card, a digital wallet like Apple Pay, or even cryptocurrency. Not offering their preferred method is an easy way to lose a sale. If you're weighing your options, looking at a visual guide to common payment methods can give you a clearer picture of what's out there.
Key Takeaway: Your payment gateway is one of the most direct ways you build trust. A professional, secure checkout page tells customers their financial data is safe, and in today's world, that's non-negotiable.
Operational Efficiency and Security
Looking beyond what the customer sees, your choice of gateway has a huge impact on your daily grind. A solid system means fewer failed transactions, which translates to less time spent on frustrating troubleshooting and more accurate financial reports. It just makes life easier.
Then there's the big one: security. A top-tier gateway is your first line of defense against fraud, protecting both you and your customers. It takes the headache out of PCI compliance and data encryption, shielding your business from serious liability and safeguarding your brand’s hard-won reputation.
For store owners ready to embrace modern payment options, it's worth seeing how different solutions stack up. If you're curious, we've put together a guide on the best cryptocurrency payment gateway for WooCommerce that shows how alternatives like BlockBee fit into the modern payment ecosystem.
Ultimately, picking a gateway isn't just a technical task—it's about future-proofing your business. With a solution like BlockBee, you’re setting yourself up with a secure, flexible, and efficient system that can grow with you as customer preferences continue to evolve.
Alright, let's get your WooCommerce store ready for a new payment gateway. Jumping straight to the installation is a classic rookie mistake. A little prep work now saves a world of headaches later, especially when you're dealing with how your business gets paid.
First things first: back up your website. I can't stress this enough. Think of it as your "undo" button. If anything goes sideways during the setup—a plugin conflict, a weird server error—a recent backup lets you rewind to a working version of your store in minutes. It’s your ultimate safety net.
Running a Few System Checks
With a fresh backup in hand, it's time to pop the hood and check your core software. New plugins, especially for payments, are built to work with the latest versions of WordPress and WooCommerce. Running outdated software is not only a security risk but a common cause of compatibility bugs that can break your checkout.
You can quickly see what you're running by heading to your WordPress dashboard and clicking on Dashboard > Updates.
Just as crucial is your server's PHP version. BlockBee, like most modern plugins, needs a recent version of PHP to run properly. You can usually find this info in your hosting control panel (like cPanel or Plesk). If not, a quick search for a "PHP version" plugin will get you the answer.
A valid SSL certificate is non-negotiable. It's what puts the "S" in
https://and encrypts the connection between your customer's browser and your store. Without SSL, most payment gateways won't even function, and you'll erode customer trust instantly. It's a must-have.
Double-Checking Plugin Compatibility
Now that your foundation is solid, let’s make sure the plugin itself is a good fit. Before you download anything, head over to the plugin’s official page on the WordPress repository. This is where you'll find the most reliable compatibility information directly from the developers.
For instance, here’s a look at the official page for the BlockBee for WooCommerce plugin:
As you can see, it clearly states the required WordPress and WooCommerce versions. A quick glance here confirms whether your setup is ready. Taking 30 seconds to do this can save you hours of troubleshooting down the line.
Once these checks are done, you're in a great position. You’ve minimized risk, confirmed your store is technically ready, and built a stable foundation. Now you can move on to the actual installation with confidence, knowing you’ve covered all the bases for a smooth launch.
Installing and Activating the BlockBee Plugin
Alright, let's get BlockBee working in your store. The great thing about the WordPress ecosystem is how plugins like this one are designed to be almost effortless to install. You can get this new WooCommerce payment gateway added right from your admin dashboard—no manual file uploads needed.
First, head to your WordPress admin panel. Look for Plugins > Add New in the left-hand menu. A search bar will pop up on the right; just type in "BlockBee for WooCommerce." The plugin you want should be the first one that appears. Hit "Install Now," and WordPress will take care of the rest. Once that button changes to "Activate," click it. Just like that, BlockBee is officially part of your site.
Finding Your Crucial API Key
Activating the plugin is just the first step. For it to actually do anything useful, it needs to communicate securely with the BlockBee network. This is where your API key comes in. Think of it as a secret handshake between your store and BlockBee, proving that every request is legitimate.
Getting this key is the most critical part of the setup. Here's what you need to do:
- Sign up for BlockBee: If you haven't already, go to the BlockBee website and create an account. It’s a pretty quick process.
- Locate your dashboard: Once you're logged in, poke around your dashboard until you find the API settings area.
- Generate the key: You'll see an option to generate your unique key. Copy that long string of text and numbers carefully—you'll need it in a second.
Remember, treat this API key with the same security as you would a bank password. Never share it or leave it stored in a public place.
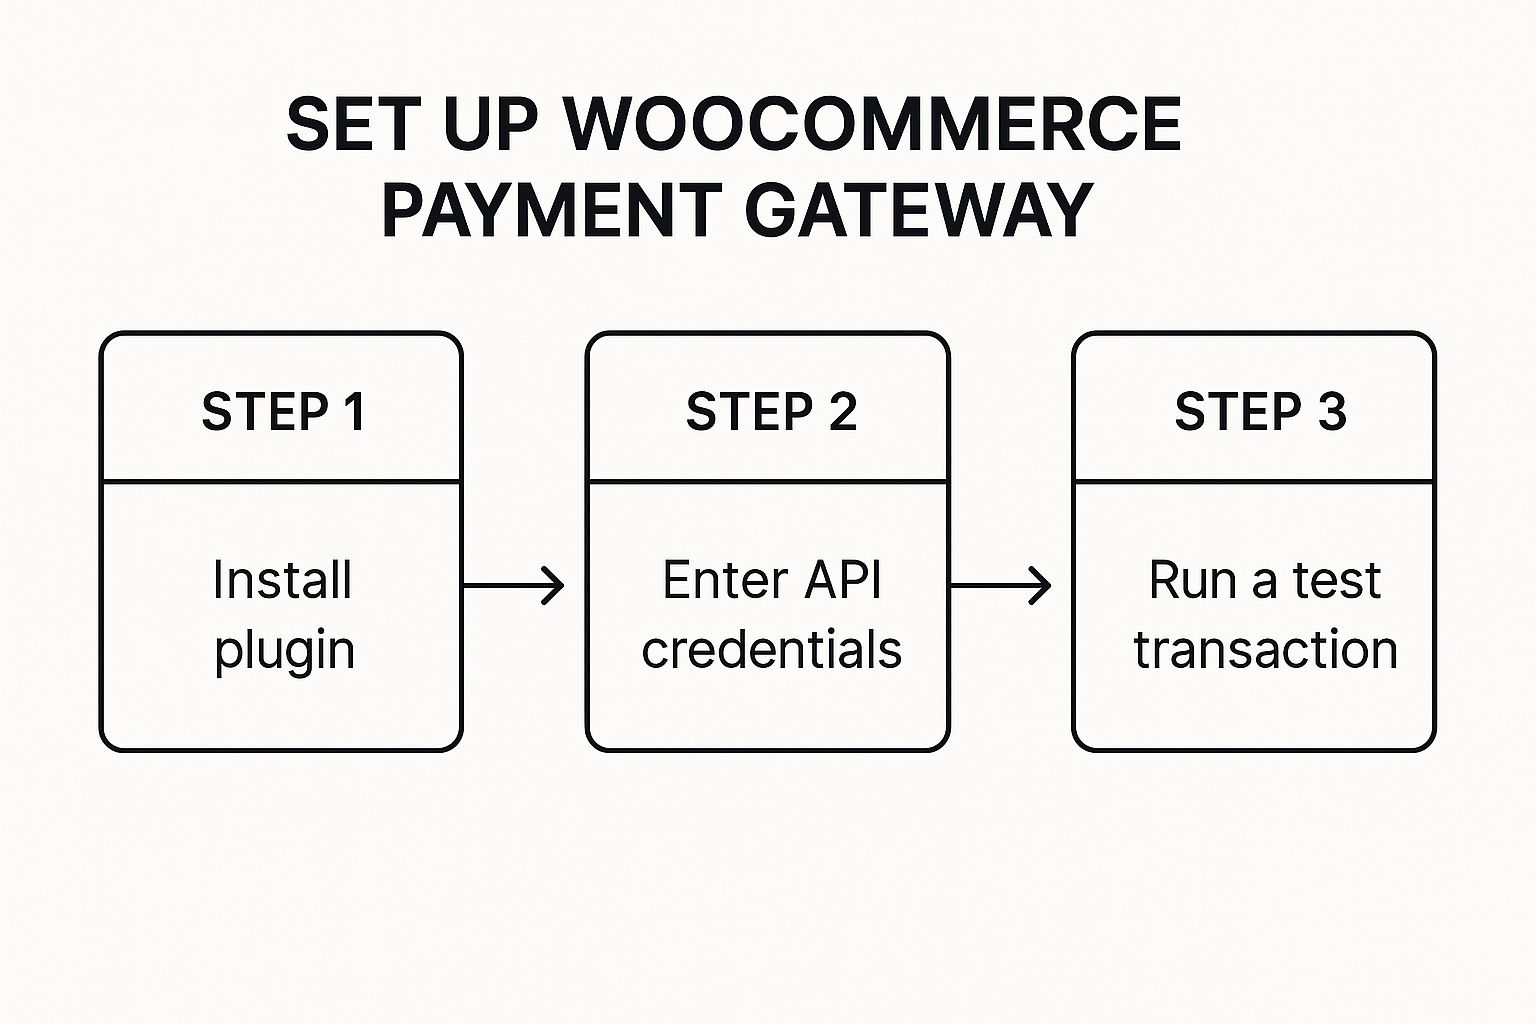
The general process for integrating a new payment gateway into WooCommerce follows a similar pattern, as you can see below.

This visual just hammers home the point: after you install a plugin, the real work happens when you connect it securely with the right credentials.
Why This Connection Matters
Without a valid API key, your store is essentially cut off. It has the capability to accept crypto, but it can’t make the "call" to the BlockBee service to generate a payment address or confirm a transaction on the blockchain.
I've seen it time and time again—rushing this part is the number one cause of integration headaches. Take an extra moment to double-check you’ve copied the entire API key correctly. It can save you hours of troubleshooting why payments aren't processing down the line.
A shaky API connection can also impact your site's performance. For instance, a while back, an update to the official Stripe gateway had a bug that created excessive network requests, slowing stores to a crawl until a patch was released. This just goes to show how vital a stable, correctly configured API connection is.
By getting your BlockBee key set up properly from the get-go, you're building a solid foundation for your new payment system. Now that the plugin is active and you have your key, we're ready for the final configuration.
Fine-Tuning Your BlockBee Gateway Settings

Alright, you've got the BlockBee plugin installed and your API key ready to go. Now for the fun part: making it work exactly how you want it to. This is where you’ll dial in the settings to perfectly match your store’s workflow.
Head over to WooCommerce > Settings > Payments in your WordPress dashboard and click on the BlockBee option. This is your command center.
The very first thing you need to do—and the most critical—is to paste in your API key. If you skipped this earlier, now’s the time to pop over to your BlockBee account and copy it. This key is what connects your store to the BlockBee service, and without it, nothing will work. It’s that simple.
Customizing The Customer Experience
With the API key saved, you can shift your focus to what your customers will actually see and interact with during checkout. These front-end settings are crucial for building trust and ensuring a smooth payment process.
- Title: This is the payment option's name. I’ve found that something direct like "Pay with Crypto" or "Secure Crypto Payments" works best. It’s clear and tells the customer exactly what to expect.
- Description: This is the little snippet of text that appears underneath the title. You could add something helpful like, "Pay securely with Bitcoin, Ethereum, and other cryptocurrencies. A unique payment address will be generated for you on the next screen."
You’ll also want to customize the payment instructions—the messages customers see after they’ve placed an order but before the payment is confirmed. Keep them crystal clear to prevent confusion and cut down on support tickets. A good tip is to remind them not to close the browser window until their payment is sent.
One of the big reasons so many people love WooCommerce is its incredible flexibility. Merchants can integrate well over 100 different payment gateways, giving customers the options they know and trust. BlockBee slides right into this ecosystem, offering a modern choice for a new generation of shoppers.
Technical Parameters and Behind-The-Scenes Setup
Now, let's get into the more technical side of things. These settings are the engine of your payment gateway, controlling how it all operates behind the scenes. Getting these right is key to reliable payment processing.
The Callback URL is absolutely essential. Think of it as a dedicated hotline from BlockBee back to your store. BlockBee uses this URL to send updates on transaction statuses. The plugin generates this URL for you automatically—all you need to do is copy it from your WooCommerce settings page and paste it into the correct field in your BlockBee dashboard. This is what tells WooCommerce to update an order from "Pending" to "Processing" once a payment is confirmed.
Pro Tip: When you paste the callback URL, double-check for extra spaces or typos. I've seen it happen countless times—a tiny error here is the number one reason orders get stuck in "Pending." Your store simply never gets the "payment complete" message from BlockBee.
Another incredibly useful setting is the Allowable Price Variance. We all know crypto prices can swing wildly. This setting lets you set a small buffer—say, 0.5%—to account for these fluctuations. If the amount a customer pays is slightly different from the order total (within your set percentage), the payment will still be accepted. It’s a small detail that prevents a lot of headaches caused by price movements between checkout and blockchain confirmation.
The table below breaks down the most important settings you'll encounter.
BlockBee Configuration Options Explained
| Setting Name | What It Does | Recommended Value/Use Case |
|---|---|---|
| API Key | Authenticates your store with the BlockBee service. | Required. Copy directly from your BlockBee dashboard. |
| Title | The name of the payment method displayed at checkout. | "Pay with Crypto" or a similar clear, descriptive name. |
| Description | A short explanation shown below the payment method title. | Briefly explain the process, e.g., "Pay with major cryptocurrencies." |
| Callback URL | The URL BlockBee uses to send payment status updates to your store. | Copy the auto-generated URL from the plugin settings into your BlockBee dashboard. |
| Allowable Price Variance (%) | A percentage buffer to account for crypto price volatility. | 0.5% to 1% is a good starting point to avoid failed payments from minor price swings. |
| Minimum Transaction Value | The minimum order total required to use this payment method. | Set based on your average order value and to avoid tiny, unprofitable transactions. |
Getting these settings right ensures a smooth, professional experience for both you and your customers.
For store owners looking to add these kinds of payment methods, understanding the broader strategy is just as important as the technical setup. To learn more, check out our guide on how to accept crypto payments for your business. It provides great context for managing digital currency transactions on a day-to-day basis.
Alright, you've got your new crypto payment gateway installed. Before you pop the champagne and flip the switch to "live," there's one critical step left: you absolutely have to test it.
Launching a new payment system without a thorough test run is a recipe for disaster. Think of it as a pre-flight check for your e-commerce store. You need to be sure everything works seamlessly before real customers—and their money—are involved.
The best way to do this is on a staging site, which is just a private copy of your live store. It's the perfect sandbox environment. You can place fake orders, intentionally break things, and troubleshoot any hiccups without impacting your live customers, sales data, or SEO.
Walk a Mile in Your Customer's Shoes
The first thing to do is simulate the entire customer journey from start to finish. Don't just click the "pay" button and call it a day. You need to experience your own checkout process.
- First, go to your shop and add a product to the cart.
- Next, head to the checkout page and fill out all the details, just like a real shopper would.
- When it's time to pay, select the BlockBee crypto option.
- Finally, follow the prompts to complete the mock payment with a test transaction.
This little exercise is incredibly revealing. You'll see exactly what your customers see. Are the payment instructions easy to understand? Does the BlockBee window pop up correctly? Is there any part of the flow that feels awkward or confusing? Finding these usability wrinkles now will save you a ton of headaches later.
One thing I've learned is that even the slickest payment gateway can't fix a slow website. If your pages take forever to load, customers will get frustrated and leave before they even get to the payment step. It’s worth taking some time to learn how to speed up a WordPress website for a much better user experience.
Check Under the Hood
Once you’ve submitted the test order, the real verification begins on the backend. This is where you confirm that WooCommerce and BlockBee are communicating perfectly.
Head over to your WordPress dashboard and then log into your BlockBee account. You'll want to check a few specific things:
- WooCommerce Order Status: Did the order status change automatically? It should go from "Pending payment" to "Processing" or "Completed" after the payment is confirmed. If it's stuck, something is wrong.
- BlockBee Transaction Logs: Now, look at your BlockBee dashboard. You should see a record of the test transaction. Make sure the amount and currency match the order you placed.
- Callback Handshake: This is the most common point of failure I see. The test confirms whether BlockBee’s callback signal—the message that tells your store the payment was successful—is actually reaching its destination. An order stuck in "pending" almost always points to a callback problem.
Running through these checks systematically helps you catch and fix issues like API errors, currency conflicts, or a broken callback URL before they ever affect a real customer. Getting this process down is fundamental to running a smooth operation. For a broader look at the operational side of things, check out our guide on how to accept cryptocurrency payments for your business.
A Few Common Questions About Payment Gateways

Even with the smoothest setup, you're bound to have questions when adding a new payment gateway to your WooCommerce store. Let's walk through some of the most common things I see store owners ask when they’re integrating a system like BlockBee.
What Happens If a Payment Is Delayed?
This is a classic crypto scenario: a customer sends funds, but the blockchain takes a few minutes to confirm it. What happens to their order in the meantime?
Don't panic. The order won’t just vanish into the ether. A well-built gateway like BlockBee is designed for this exact situation. Inside WooCommerce, the order will typically be marked as “On Hold” or “Pending Payment.” The system simply waits for the confirmation signal from the crypto network.
You can even adjust the timeout period right in the plugin settings. If a payment doesn't get confirmed within your set timeframe, the order can be canceled automatically. This is a great feature to prevent a backlog of unpaid orders.
Can I Offer Multiple Payment Gateways at Once?
Absolutely—in fact, you really should. WooCommerce was built from the ground up to handle multiple payment options. You can easily offer BlockBee for crypto payments right alongside traditional providers like Stripe or PayPal.
This flexibility is a massive advantage for your conversion rates. Time and again, studies show that giving people more ways to pay reduces abandoned carts. When a customer can use their preferred method, whether that's a credit card or cryptocurrency, you’re knocking down a major barrier to purchase.
My Take: I like to think of payment options as lanes on a highway. The more lanes you have open, the more traffic can get through. Forcing everyone into a single payment lane is like creating a traffic jam at rush hour.
How Do I Handle Refunds?
This is where crypto payments differ quite a bit from the traditional banking world. The refund process generally happens outside of your WooCommerce dashboard.
With a gateway like BlockBee, you'll log into your BlockBee account to send the funds back to the customer. Once you’ve processed the refund there, you’ll pop back over to WooCommerce and manually update the order status to “Refunded.” This two-step process keeps your sales records accurate. It's always a good idea to double-check the specific documentation for any gateway you use, as the exact steps can vary.
Is an SSL Certificate Really That Important?
Yes. Full stop. This is completely non-negotiable for any e-commerce site. An SSL certificate encrypts all the data traveling between your customer’s browser and your store’s server. It’s the technology that adds the "S" to https:// in your URL and protects sensitive personal and payment details.
Most modern payment gateways, BlockBee included, simply will not work without a valid SSL certificate. It's a foundational piece of security, a requirement for PCI compliance, and, frankly, the key to earning the customer trust you need to make a sale. Your checkout page is the last place you should ever compromise on security.
Ready to give your customers a secure, modern, and flexible way to pay? BlockBee offers a simple solution for accepting over 70 different cryptocurrencies with low fees and instant payouts.
